


(Bypass Windows 8 CPU feature checks)
Windows 8 kurulum sırasında işlemci kontrolü yapıyor ve uygun değilse kuruluma geçmiyor.

W8CPUFeaturePatch uygulamayla bunun mümkün.
W8CPUFeaturePatch can be used to bypass the checks for the availability of the following CPU features in Windows 8: PAE, NX, SSE2, CMPXCHG16B.
Which patches do I need?
Click Remove PAE check if your CPU doesn't support PAE
If your CPU doesn't support SSE2, NX or both (missing PAE support implies missing NX support) click Remove SSE2 and NX check
To enable support for more than one logical CPU core after patching NX, click Fix hyper-threading in hal.dll and Fix hyper-threading in halmacpi.dll
If you want to get rid of the digital signature warning on boot after applying one of the patches above, click Remove winload patchguard x86
Click Remove various CPU feature checks in Windows 8.1 x64 if you want to skip some CPU feature checks (like CMPXCHG16B support) in Windows 8.1 x64
Click Remove winload patchguard of Windows 8.1 x64 to skip the digital signature warning that appears on boot after applying the Windows 8.1 x64 check.
How to apply the patches?
Create an ISO image by following FaiKee's guide or apply the patches from Windows PE.
W8CPUFeaturePatch.exe and W8CPUFeaturePatch x64.exe do the same things. The only difference is that W8CPUFeaturePatch x64.exe is compiled for x64. Use it if you want to patch from Windows PE x64 since you can't run 32 bit applications on Windows PE x64.
1.YOL:
FaiKee's guide
If you wish to pack your own ISO with the patched ntoskrnl:
1. First, you need to have imageX, but I would suggest GimageX(the G is for graphical UI):
http://gimagex.software.informer.com/2.0/
2. I suggest to make a new drive or VHD for about 10G, because if you do it in a folder inside your running OS drive, it would be a pain trying to delete the big folder with all the windows system files, with a separate drive/VHD, you just delete or format it.
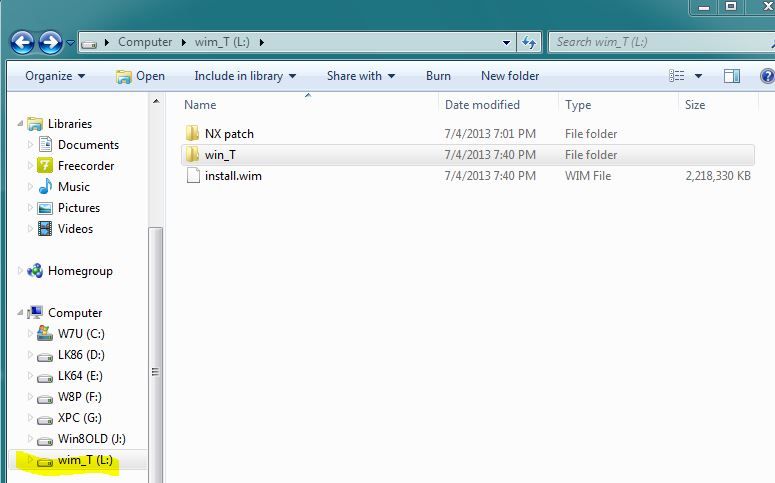
3. Mount the win8 ISO, and copy \sources\install.wim into the new drive.
make a new folder, call it win_T (or whatever).
make another new folder, call it NX patch, copy the checksumfixed ntoskrnl from @moderate into it, or you can patch the file yourselves with @Jan1's tool, after you unpack install.wim .
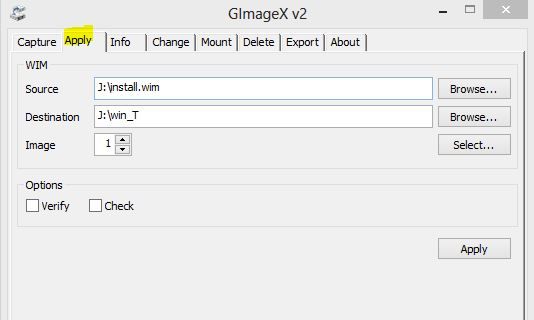
4. launch GimageX, click apply tab, and unpack install.wim contents into win_T, you should find the folder \windows\system32 in it.
5, copy the patched ntoskrnl.exe in "NX patch" into win_T\windows\system32, you should see a dialogue asking if you wish to replace the original file, click OK.
6. Delete or move the install.wim to somewhere else, then in GimageX, click "capture" tab, and create a new install.wim from win_T that has the replaced ntoskrnl.
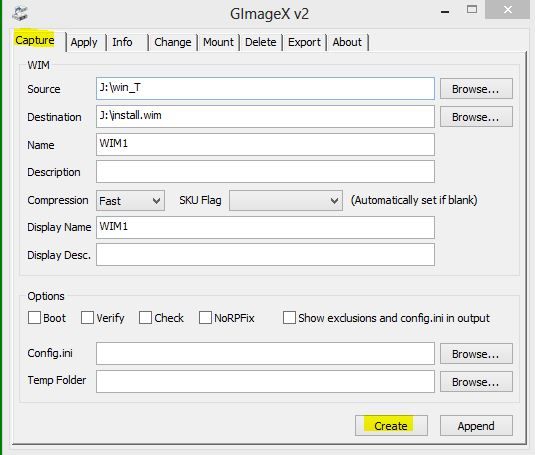
7. Open up UltraISO(or whatever you have), mount the win8 ISO, and copy the patched install.wim into \sources; click OK for the replacement dialogue, and save as a new ISO file, and you are done
---------------------
2.YOL:
FaiKee's guide
As you might notice, @Jan1's guideline is to install win8/8.1 on a clean disk; I would show how to install from win7, you can forget about downloading or making an ISO:
1. Download w8patchKit (@Jan1's patch tool, GimageX, EasyBCD, coreinfo, win7 reg tweak):
Kod: Tümünü seç
https://app.box.com/s/jqzsp8cssehk68nftcp63. Check with coreinfo on what your CPU doesn't support, or, you can say "LOL, what the heck" - and simply apply both patches to bypass NX/PAE/SSE2 altogether.
4. Mount the win8/win8.1 ISO, I use win8.1 Pro X86 Chinese, if you don't have a ISO apps, open it in winrar. Copy sources\install.wim to C: or anywhere you like.
5. Open GimageX, goto "apply" tab, source is C:\install.wim ; destination is E:, and apply
6. If you have not installed "right click take ownership" apps, launch "win7 reg tweak".
Then goto E:\windows, take ownership of System32
7. Open @Jan1's patch tool, right click W8CPUFeaturePatch -> run as admin ; I clicked "remove SSE2 & NX check" ; and on the browse windows choose E:\windows\system32\ntoskrnl , run and get the "Done" pop-up
8. Apply the "remove winload patchguard X86" ; this time choose E:\Windows\system32\winload.exe
9. Install EasyBCD; add a boot item to boot from E: ; name it windows 8 or whatever you like, and set it as default.
10. Open CMD(Admin); enter bcdedit /enum ; check that windows 8 is identifier "default", and is in drive E ;
then enter(paste) : bcdedit /set {default} NoIntegrityChecks Yes
11. REboot, in the boot menu choose windows 8 ; and it should proceed to install ; suggest you choose "custom setup" and disable windows update, otherwise it will also install all the updates, and a risk to cause trouble in setup, you can enable it after installation.

12. Done!
---------------------
3.YOL:
Apply the patches from Windows PE
Install Windows 8 files and bypass CPU feature checks
This is how I installed Windows 8 on an empty harddisk (i.e. there were no existing partitions):
1- Copy W8CPUFeaturePatch.exe, imagex.exe and <Windows 8 ISO>\sources\install.wim to a pen drive/external hard drive.
2- Boot the target computer from a Windows 7 CD.
3- Press Shift + F10 when the Install Windows window appears.
4- Create and mount a NTFS partition:
Kod: Tümünü seç
diskpart
select disk 0
create partition primary
format fs=ntfs quick
active
assign letter=W
exit
5- Now connect the pen drive/external hard drive and replace P: in the commands below with its drive letter.
6- Apply Windows 8 image on the partition:
Use this for Windows 8 Pro:
Kod: Tümünü seç
P:\imagex.exe /apply P:\install.wim 1 W:\Kod: Tümünü seç
P:\imagex.exe /apply P:\install.wim 2 W:\Kod: Tümünü seç
copy P:\W8CPUFeaturePatch.exe W:\
W:\W8CPUFeaturePatch.exe
** If your CPU doesn't support SSE2, NX or both (missing PAE support implies missing NX support) click Remove SSE2 and NX check.
** To enable support for more than one logical CPU core after patching NX, click Fix hyper-threading in hal.dll and Fix hyper-threading in halmacpi.dll.
** If you want to get rid of the digital signature warning on boot after applying one of the patches above, click Remove winload patchguard x86.
** Click Remove various CPU feature checks in Windows 8.1 x64 if you want to skip some CPU feature checks (like CMPXCHG16B support) in Windows 8.1 x64.
** Click Remove winload patchguard of Windows 8.1 x64 to skip the digital signature warning that appears on boot after applying the Windows 8.1 x64 check.
8 -Install BCD and write MBR:
Kod: Tümünü seç
bcdboot W:\Windows /s W:
bootsect /nt60 W: /force /mbrKod: Tümünü seç
bcdedit /set {default} NoIntegrityChecks YesKod: Tümünü seç
wpeutil rebootKod: Tümünü seç
bcdedit /set {current} RecoveryEnabled NoIf Windows Update replaces hal.dll, halmacpi.dll, ntoskrnl.exe or winload.exe, you have to reapply the corresponding patch. hal.dll or halmacpi.dll got updated if Windows is stuck on the spinning dots on boot. ntoskrnl.exe got updated if you see a 0x0000005D BSOD on boot and winload.exe got updated if Windows complains that the digital signature of ntoskrnl.exe does not match (you can temporarily bypass the signature check by pressing F6 followed by F7).
1-Boot the target computer from a Windows 7 CD.
2-Press Shift + F10 when the Install Windows window appears.
3- I assume that W8CPUFeaturePatch.exe was already copied to the root of the system partition and that the system partition is C:
Run
Kod: Tümünü seç
C:\W8CPUFeaturePatch.exeKod: Tümünü seç
wpeutil rebootNotes:
The patch does not make Windows 8 compatible to your CPU since it only bypasses the compatibility checks. This means that if Windows 8 tries to use one of the features, your computer will probably crash. For example, if you applied the CMPXCHG16B patch, a 0x0000001E (KMODE_EXCEPTION_NOT_HANDLED) BSOD with error code 0xFFFFFFFFC000001D (STATUS_ILLEGAL_INSTRUCTION) could occur if a CMPXCHG16B instruction is attempted to be executed. The only relatively safe patches are the NX and the hal/halmacpi patch.
The tool cannot predict how the feature checks will be implemented in future file versions of the files to be patched, which means that there is a risk that future file versions cannot be patched
For the reasons above, don't use these patches on your main OS!
If Windows is stuck at the spinning dots on boot, you have to disable hyper-threading or to patch hal.dll and halmacpi.dll
You have to run bcdedit /set {default} NoIntegrityChecks Yes if you patched winload.exe
Anlatımda adı geçen programlar:
Kod: Tümünü seç
https://app.box.com/s/n0a0k84a664iwoq4687uKod: Tümünü seç
https://app.box.com/s/fsoedfzytoqi2jx9gentNOT: denedim ama bilgisayarımda RAM in yeterli olmadığına dair uyarı aldım. Deneyen olursa sonucu yazarsa sevinirim.
Yazan: Mendenn


